GROWING DAYLILIES FROM SEED
by Kathy Rinke
Starting Daylily seeds is quite simple regardless of your gardening experience.
There
are as many different methods of starting Daylilies from seed as their
are growers. Don't be afraid to experiment and find what works best for
you. You could just stick them in the ground somewhere and let
nature take it's course. I prefer to start my seeds under lights during
the winter. Not only does this give my seedlings a head start, but it
gives me that gardening fix I need during the long winter months. An
easy set up is to use a chrome shelf that you can purchase from a "big
box" store, and hang regular shop lights from the shelves. You do not
need special lights in the fixtures.
Most people agree that the
seeds need a cold period of at least 3 weeks in order to germinate. If
you have grown and harvested your own seed, this can be accomplished by
drying the seeds for at least 24 hours, and then storing them in the
refrigerator for a few weeks. If you have purchased seed, the grower has
probably had them in the refrigerator long enough, and they should
indicate that when you make a purchase. As soon as I receive or harvest
and dry my seeds, I put them into zip-loc bags with the cross clearly
marked on it and then into a plastic container in the fridge until I am
ready to start them. I usually begin planting seeds in January or
February.
There are many different mediums and containers that
you can start your seeds in. Many people use trays and start lots of
seeds in each one. I prefer to start mine in individual pots or a
product called "bio sponges" available from Parks Seed. (I use the 40 cell size, click here to check them out.) If you start a
lot the "bio sponges" can be a bit costly, but they make the process
very easy with no mess. You can leave the seedlings in the sponges for
months, provided you keep the trays filled with water, and add some weak
fertilizer occasionally. You don't really need the entire dome just the cells with sponges will do if you have a tray they will fit in. Just cover with a layer of plastic to form a greenhouse environment until the seeds sprout. (I would get a few each year, and asked for them for Christmas. Once you have them, they can be used over and over with only the purchase of the refill sponges.)
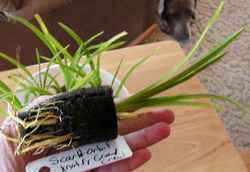
Root Development Using "Bio Sponges"
What ever medium you use, pre-moisten your mix before planting the seeds. This works much better than trying to water after you have planted your seeds. Just fill a container/tub with the mix, and add enough water until it's the consistency you want. It should hold together in a clump when you grab a handful but not be wet. Fill up your pot and then add the seeds. The soil line should now be about 1/2 to 1" below the rim. Place the seeds in the pot, and cover the seed with more soil. There should be no more depth of soil on top of the seed than the size of the seed. (Have to say, that I have experimented with planting depth since the original writing of this article, and don't think the seeds are that fussy. I've planted some deeper and they do just fine. They just take a bit longer to poke through.)
Loosely lay a piece of plastic wrap over the top of the pot. You don't need to put this pot anywhere in particular until the plants start to appear, usually in 7 to 10 days. When you start to see green move them under your lights and take the plastic off.
You can transplant your seedlings to individual pots once they are a few inches tall, and at this point use a Miracle Grow type potting soil. I use the deepest drinking cup I can find and drill drainage holes in the bottom. Put several cups together and then just use a electric hand drill to make a few holes in them all at once.
I bottom water all my seedlings with a weak Chamomile tea. (1 tea bag per 1/2 to 1 gallon of water) I don't know why the tea works, but using it has almost eliminated damping off and seems to minimize fungus knats. I have some very sturdy trays that the pots sit in, and I simply keep them filled with my tea solution. They can go dry for a while, but most of the time I just keep the seedlings sitting in "tea".
If you use well water and a water softener, I suggest getting your water from a point before it goes through the softener. Since I started doing that, I have much healthier seedlings. Seedlings of any kind do not like the salts that are in softened water.
When Spring arrives, seedlings started in pots or flats must be hardened off gradually to full sun. Place the seedling in full sun for only 2 hours the first day, and gradually increase the amount of time in full sun. Within a week they will be strong enough to survive in the garden.
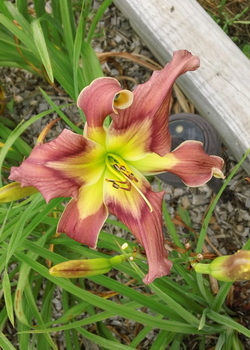
"George Jets On" x "Mythperception"
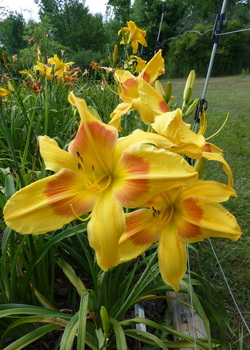
"Fooled Me x Webster's Pink Wonder"
